In my village building game I'm using alpha-tested transparency for foliage — trees, bushes, grass, etc. This works simply by discarding (i.e. not drawing) any pixels having an alpha value of less than 0.5, and keeping the others. This is much cheaper than proper transparency, which requires sorting objects or pixels by distance to camera. Here's what it looks like:
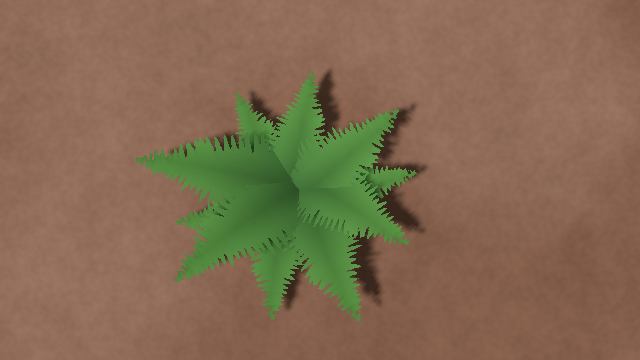
And here's the texture it uses:
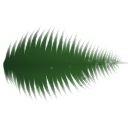
Naturally, we want these textures to have mipmaps, for the same reasons as usual: to prevent aliasing, to improve texture cache utilization, etc. But there is a problem.
Contents
Disappearing textures
Let us have a look at the same fern from a large distance. Though, it will be too small to notice anything, so let's instead pretend that we're far away and bias the mipmap selection in the shader. Specifically, I'll use WGSL's textureSampleBias function to shift the selected mipmap level by 4. And here's the result:
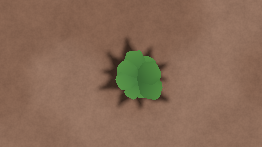
It looks kinda round, instead of being pointy like before. Somewhat hilariously, the shadows are still correct, since I didn't add the biasing to the shadow map shader.
For another example, have a look at this nice flower:
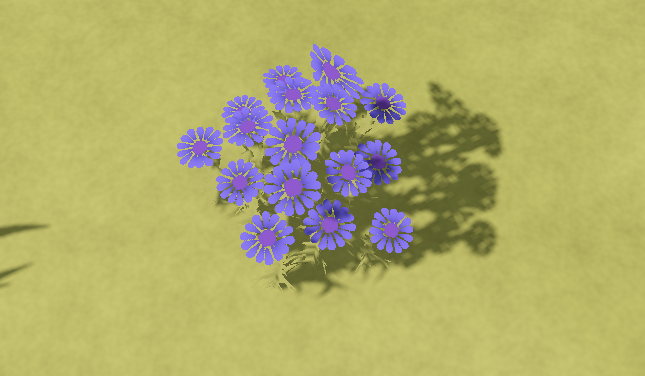
And here's the same flower with the mipmap bias added:
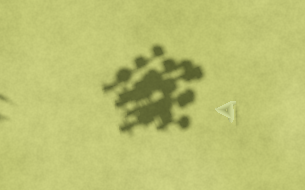
Yep, the flower simply disappeared.
It might not sound like a big deal at first, — we messed with the shader, and now it produces bad results. However, our mipmap level biasing didn't introduce the problem, it merely amplified it. These flowers, for example, do indeed disappear at some distance with the original shader (without bias), and this distance is much smaller than you'd expect.
In retrospect, it is more or less obvious why this disappearing happens: when generating mipmaps, we average the alpha values, and if the alpha mask isn't dense enough, it stops passing the alpha test. Imaging having 4 pixels, two with 60% alpha and two with 20% alpha. With alpha testing, we discard anything below 50% opacity, so we see two of the four pixels, or 50% of the image. Then we generate the next mipmap level and average these 4 values to get 40%. This pixel doesn't pass the alpha test (because 40 < 50), and the texture disappears.
This is roughly what's happening with our flower, but simplified. Here are the first 6 mipmap levels of the flower texture:

They look more or less like what you'd expect, right? But remember that we don't use true blending, but instead use alpha testing. Here's what they look like if we remove everything with less than 50% opacity:

By mipmap level 3 the stem of the flower turns into a shapeless lump, and by level 5 the texture completely disappears.
Side note: premultiply your mipmaps!
Now, before we dive deeper into this problem, I want to note that regardless of whether you're using alpha-testing or true transparency, you really, really want to have your textures in premultiplied alpha format, i.e. the RGB channels should be premultiplied by the alpha channel. Even if this isn't an option, you should at least do this while generating mipmaps, i.e. premultiply, downsample, then reverse the premultiplication.
The reason is that without premultiplied alpha, the color of transparent nearby pixels will mix with the opaque pixels, and you'll get unwanted "leaking" background color everywhere. Here's how it looks like on grass:
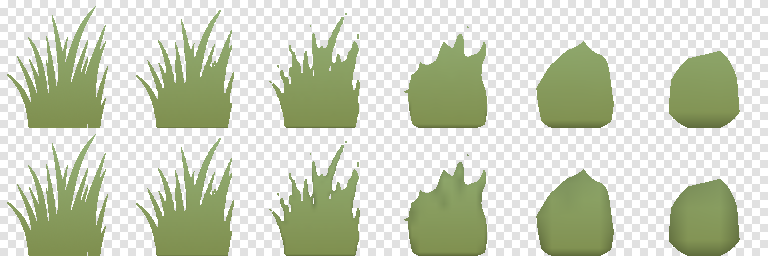
Bottom row: mipmaps generated without premultiplied alpha.
Premultiplied alpha fixes this because it effectively weighs pixel contributions by their alpha channels. When averaging alpha-premultiplied pixel values, more transparent pixels will have less contribution than more opaque pixels, and completely transparent (alpha = 0) pixels won't affect the result at all.
I should note that there are other popular solutions to this problem, like filling the transparent pixels with the color of the closest non-transparent pixels (commonly known as the solidify filter), something like this for the flower:
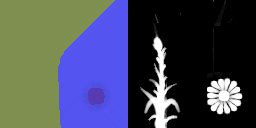
You still get some leakage of random neighbouring colors into your mipmap pixels, but this tends to be almost unnoticeable. However, I strongly prefer the premultiplied-alpha solution, as it does exactly what we'd want to happen (i.e. weighing pixels in accordance with their opacity).
In what follows, I'll tend to assume we're using premuiltiplied alpha when generating mipmaps.
Available solutions
To find out how people solve this problem, I used the time-tested method of posting my own solution (which we'll discuss shortly) on vairous social media instead, and I got a ton of useful links in return. In particular,
- This post by Ben Golus mentions the issue in the end, and suggests simply multiplying the alpha in the shader by
1.0 + lod * 0.25 - This post by Łukasz Izdebski talks in great depth about this issue, and suggests using a magic formula
max(alpha, alpha / 3.0 + 1.0 / 3.0)to re-map alpha values when generating mipmaps, - This post by Nikolaus Gebhardt also suggests a magic formula
a = mix(alpha, alphaMax, 0.35)to re-map alpha values at mipmap generation, wherealphaMaxis the maximal alpha value encountered among 2x2 pixels from the previous mipmap level that contribute to the currently computed pixel, - This post by Ignacio Castaño from The Witness also suggests re-mapping alpha values, but in a clever way that preserves the overall coverage, i.e. the percentage of pixels that pass the alpha-test,
- A lot of people suggested using SDFs, and Tristam in particular showed some promising results with it,
- This page describes something called morphological filters whose relation to our problem is a mystery to me.
So, it seems that all solutions boil down to tweaking alpha values (either using smart heuristics or magic constants, either at mipmap generation step or in the shader that samples the texture) or using SDFs (at mipmap generation — no way you'll be computing SDFs at runtime for each sceen fragment).
To me, doing this at mipmap generation makes the most sense (I'm generating them manually anyway!), so that's what I've chosen.
Hashed alpha testing & TAA
A number of people mentioned this incredible presentation by Chris Wyman from GDC 2017 about a technique called hashed alpha testing. The idea is that instead of discarding fragments based on alpha < 0.5, we discard them with alpha < rand(), and make this rand() call uniform on the 0..1 interval but also somewhat persistent so that it doesn't flicker like crazy when the object or camera moves. The effect is similar to dithering, and makes alpha-tested objects look much, much better.
If we combine this with temporal anti-aliasing, we get a double-win, because we can make our TAA integrate the transparency over time, and we basically get true transparency values for free. This is something like computing the alpha-blended version of the image using Monte-Carlo integration on randomized alpha-tested images.
Supposedly with this technique, we don't need mipmaps at all, since the stochastic alpha testing together with TAA will average everything out. Sounds great!
Unfortunately, I can't use this method, because my game also has outlines:

These outlines are added as a post-processing step and are computed purely based on depth discontinuities. If I add something like hashed alpha-testing together with TAA, I'll have a problem! If I add outlines after TAA, they will flicker a lot due to randomized alpha-testing samples. If I add outlines before TAA, they will still be randomized and the TAA will blur them, while I'd prefer them to stay nice and crisp.
Another problem is that TAA itself is pretty useless for me: these outlines typically happen on object boundaries, and so they hide most of the aliasing already. It doesn't look great, but it looks good enough for me not to care about some anti-aliasing sledgehammer.
So, no hashed alpha-testing and TAA for me, we gonna remap some alphas.
The testbed
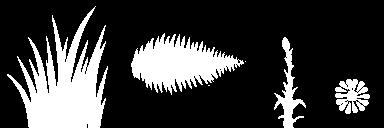
To see which method works best in my case, I'll test each of them on three textures from my game: the grass, the fern, and the flower:
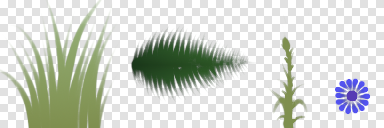
And since we're only interested in how these textures behave after alpha-testing, we'll only look at the alpha channel after alpha-testing was applied (and using bilinear filtering on them):
For reference, here's what happens for the first 6 mipmap levels with these textures using simple averaging when generating mipmaps:
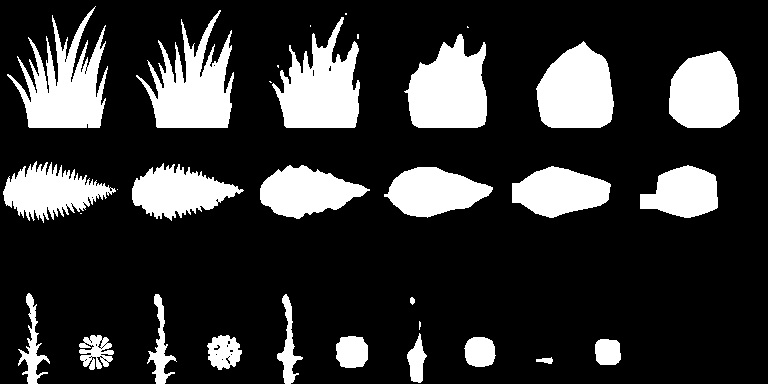
We see that the textures tend to lose detail & become blobby, — which is expected, — but also become smaller than the original texture, leading to objects looking smaller than they were or even completely disappearing (like in the case of the flower).
What I would want instead is for the textures to roughly retain the overall shape of the original texture. For my stylized non-photorealistic rendering, I don't care if the total opaque pixels coverage stays the same. I'm OK with the holes between grass blades to be artificially filled, but I'm not OK with the grass patches appearing 2x smaller than they are when viewed from a distance.
I'll also limit myself to methods that can be implemented inside the common image downsampling routine used for generating successive mipmap levels, without requiring some knowledge about the exact mipmap level being generated, just to keep the functions clean.
Some of the methods above also have the alpha cutoff value as a tweakable parameter; I will use a fixed cutoff value of 0.5 everywhere for simplicity and because that's the value I'm actually using.
By the way, all textures in this post are 128x128, and they are stored as part of a larger texture atlas, so some of the artifacts we'll see below are due to neighbouring atlas pixels leaking to our pixels via bilinear filtering. I could clean this up, but I was too lazy to do that :)
Method 1: multiplying alpha
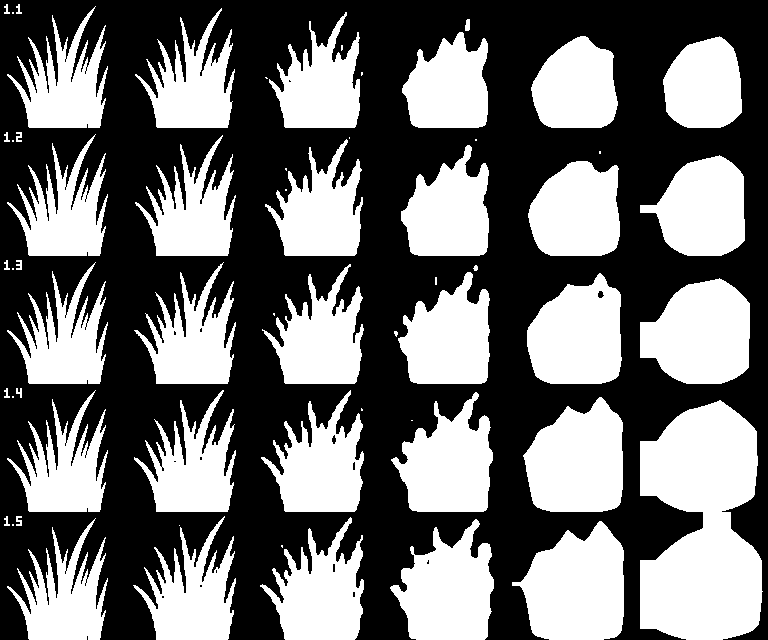
The method by Ben Golus multiplies the alpha in the shader by something like 1.0 + lod * 0.25. Since this cannot be done at mipmap generation without knowing the exact LOD number, I'll approximate this as multiplying alpha by a fixed value when downsampling the texture.
Here's what it looks like if we multiply the alpha by values from 1.1 to 1.5 for grass:
fern:
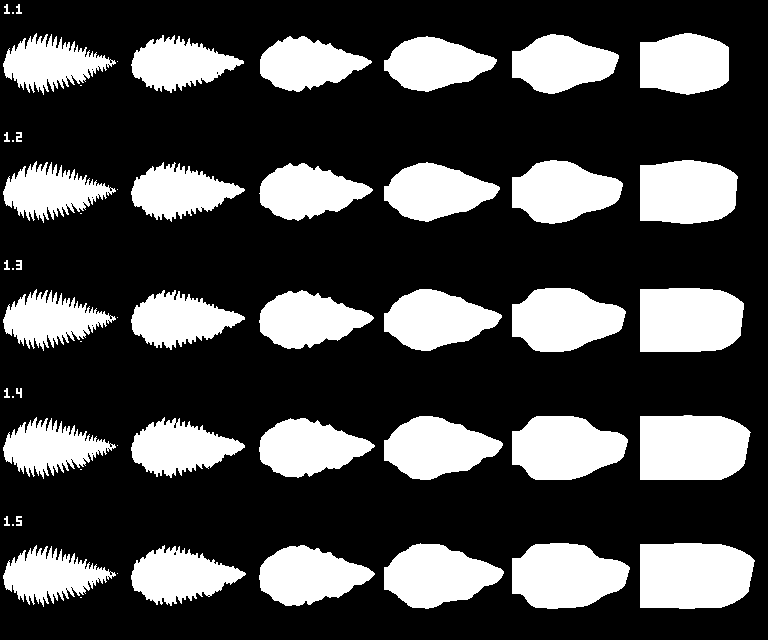
and flower texture:
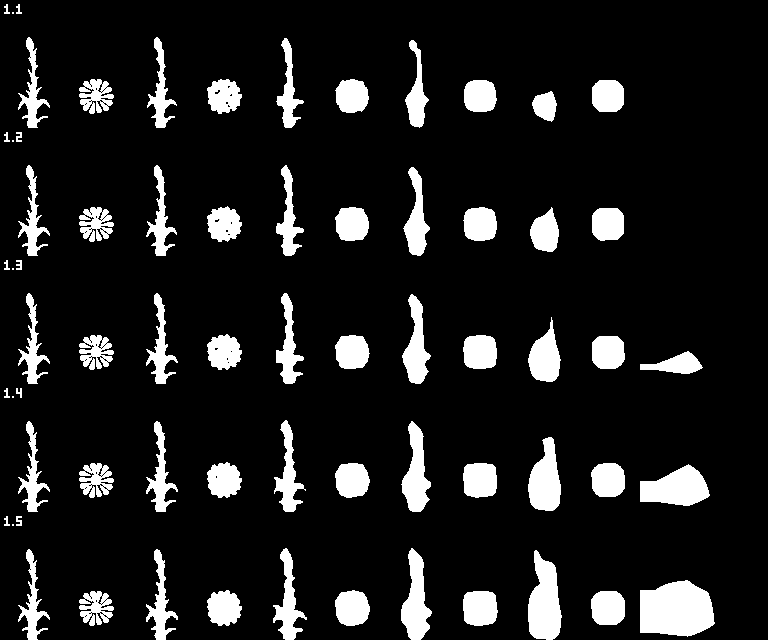
Something around 1.3 or 1.4 seems to do the job, though even 1.5 isn't enough for the flower, which gets severely distorted.
Method 2: lerping towards max alpha
The method by Nikolaus Gebhardt, after some algebraic manipulations, boils down to finding the maximum alpha value of the 2x2 pixel quad from the previous mipmap level that generated the current pixel, and then lerping the computed average alpha value towards this maximal value: newAlpha = mix(alpha, maxAlpha, coefficient). The post uses a lerping coefficient of 0.35; let's try different values from 0.25 to 1.0 (a value of 0.0 is the baseline with no remapping):

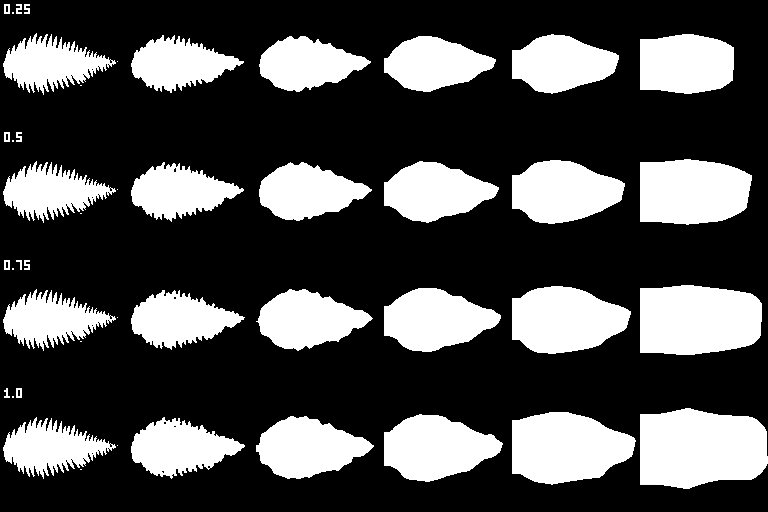
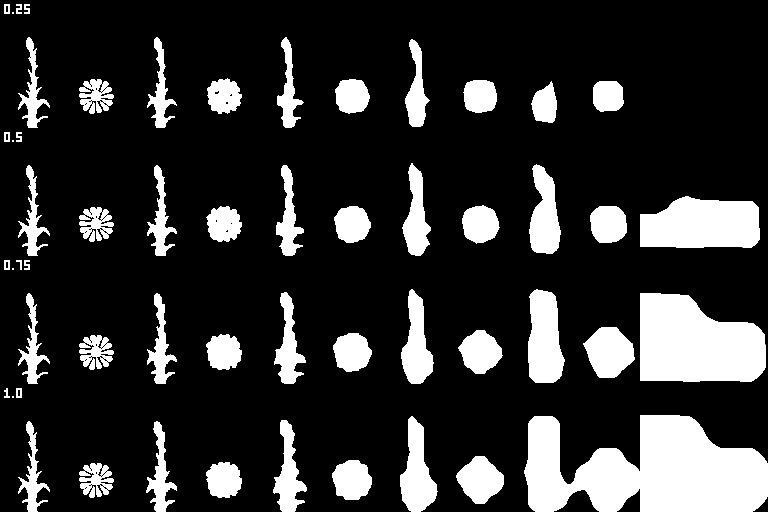
This method seems to better preserve the shape, especially for the flower texture. Level 5 still looks horrible, but hey, what did you expect from a 4x4 texture? The object would still look fine, because it has geometry and not just a texture.
I like the value of 0.75 the most; incidentally, the value of 1 means to replace the alpha value with the maximum found among the 2x2 pixel quad, and this is exactly the method I used in my original social media posts.
Method 3: lerping towards cutoff from below
The method by Łukasz Izdebski is a bit cryptic, but if we decipher and rearrange it a bit, it can be written as newAlpha = max(alpha, mix(alpha, 0.5, 2.0 / 3.0)). So, we lerp the alpha value towards 0.5 with some coefficient, and if it is greater than the already computed alpha value, we take this new value instead. It can only be greater than it was before if alpha < 0.5, so effectively what this formula does is lerp the values below the 0.5 threshold towards 0.5, while keeping the values above 0.5 intact.
Again, let's try a few different values for the lerping coefficient. Say, values from 0.2 to 0.8 (0.0 would be the baseline, while 1.0 would replace all alpha values below 0.5 with 0.5, which makes little sense):
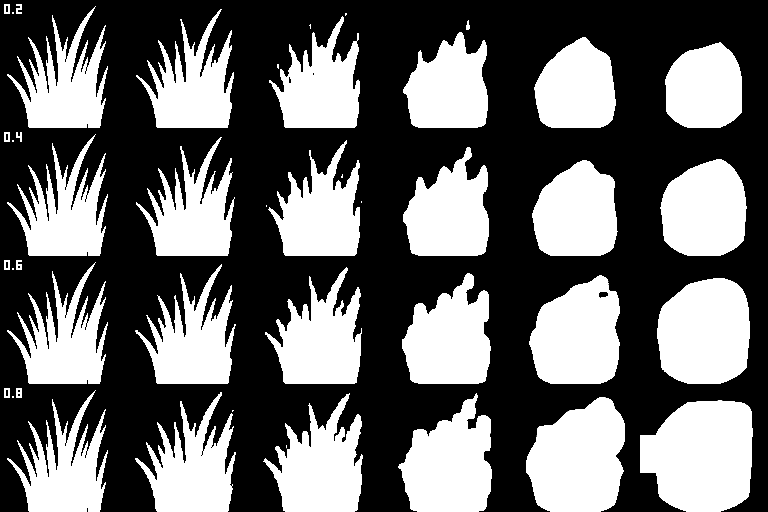
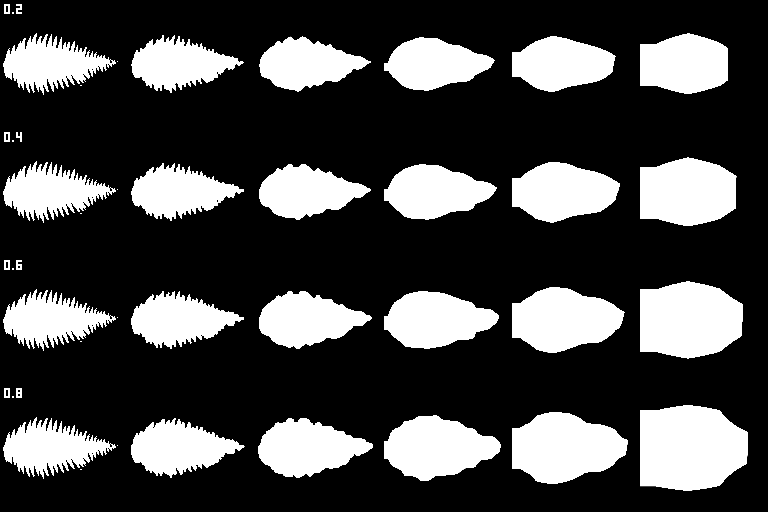
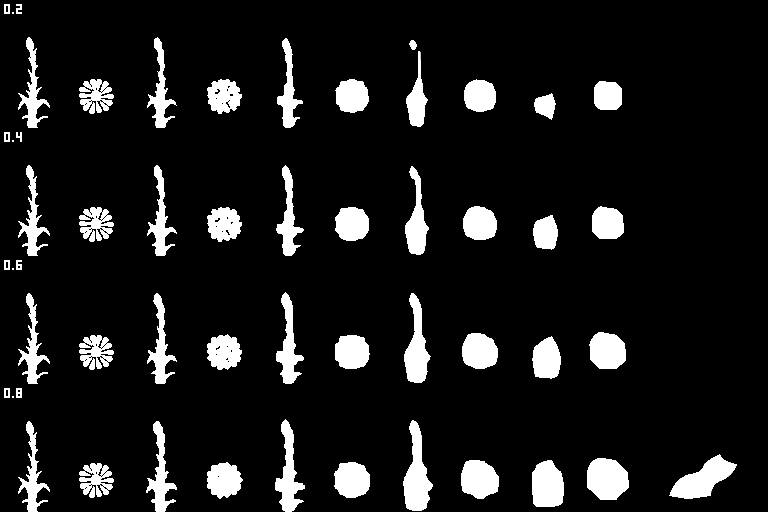
It sort of works; a value of 0.8 seems reasonable for grass, but it still isn't enough for the flowers.
Method 4: lerping towards alpha = 1
This method wasn't mentioned anywhere, but I thought I'd give it a shot as well — re-mapping the alpha values simply by lerping them towards 1 with some fixed coefficient: newAlpha = mix(alpha, 1.0, coefficient). I'll use coefficient values from 0.1 to 0.5:
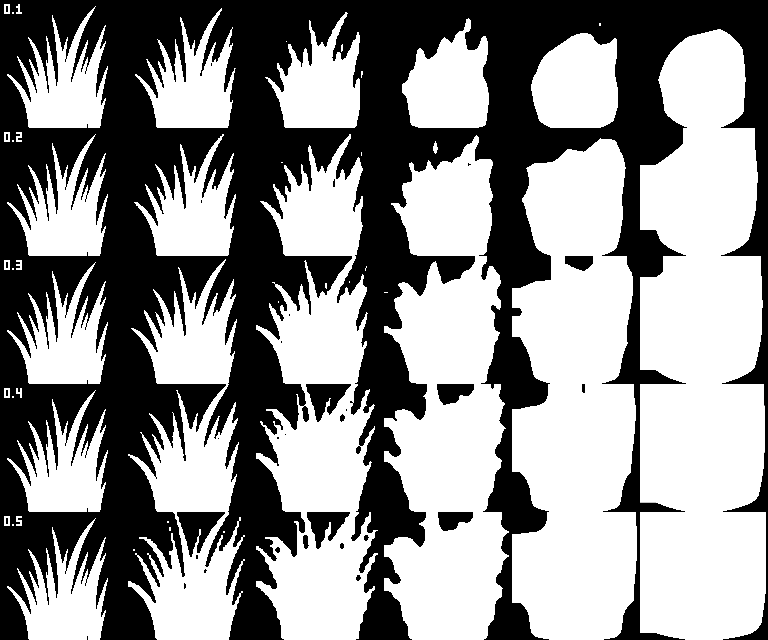
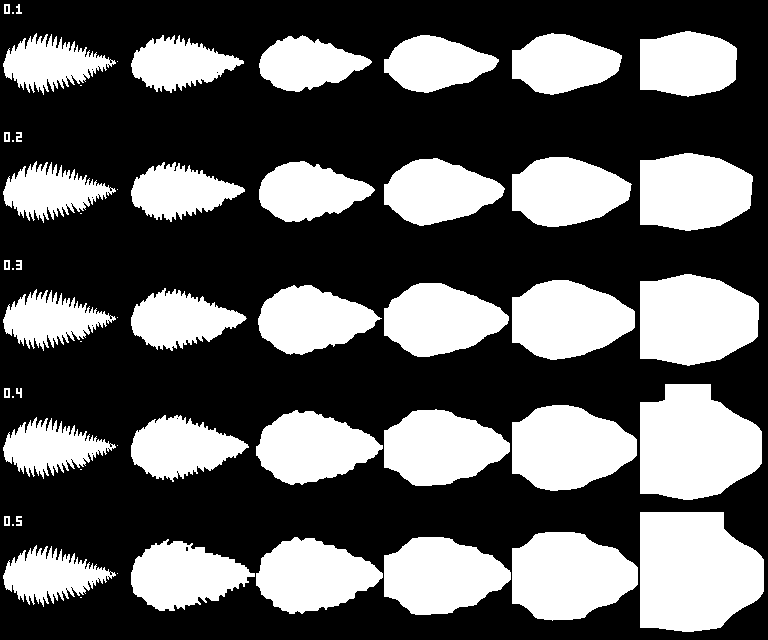
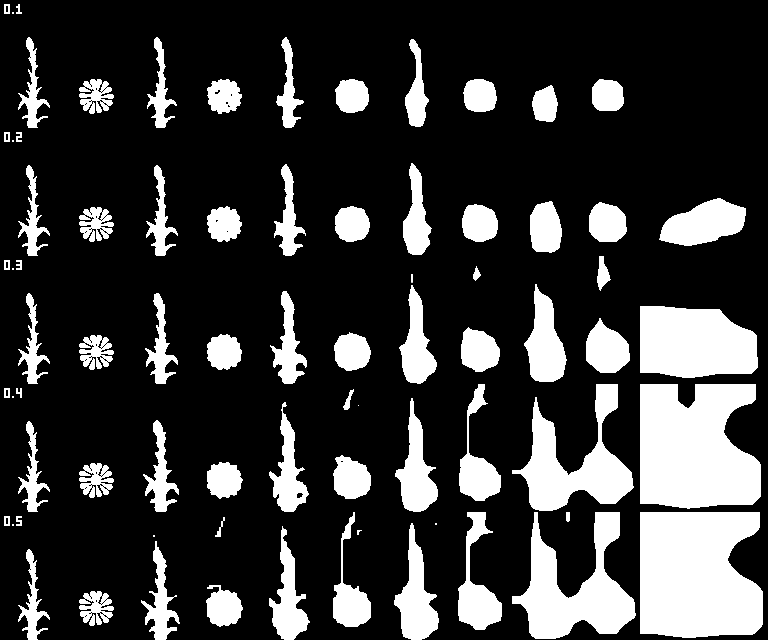
Something like 0.3 probably works, but it makes the flower texture really blobby & fractured, while also introducing a ton of artifacts due to some very transparent areas becoming erroneously visible.
Method 5: shifting alpha
Another method that wasn't mentioned — blatantly adding some constant value to the alpha channel when generating mipmaps, like this: newAlpha = alpha + coefficient. I'll use values from 0.05 to 0.20:
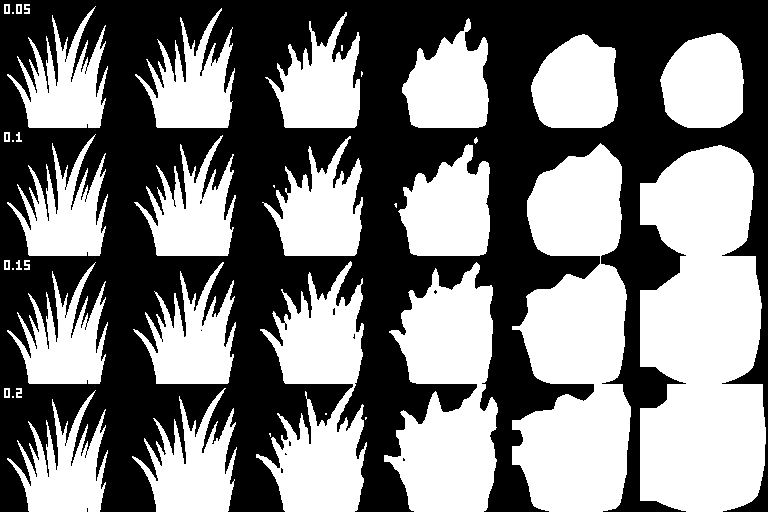
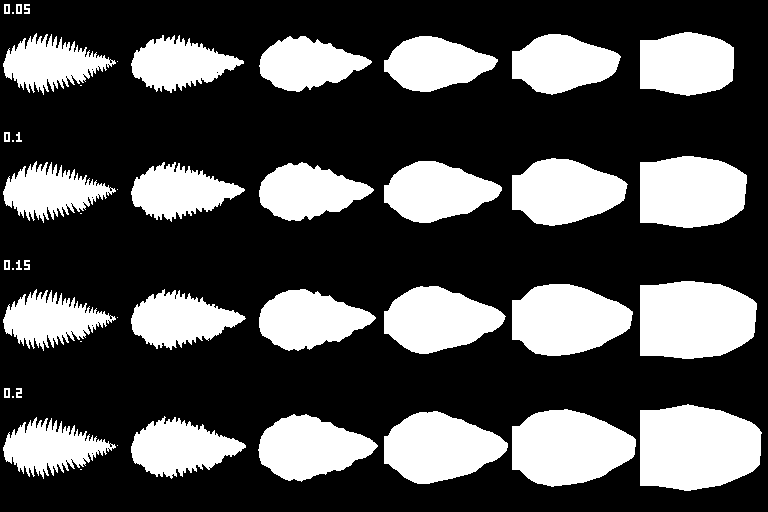
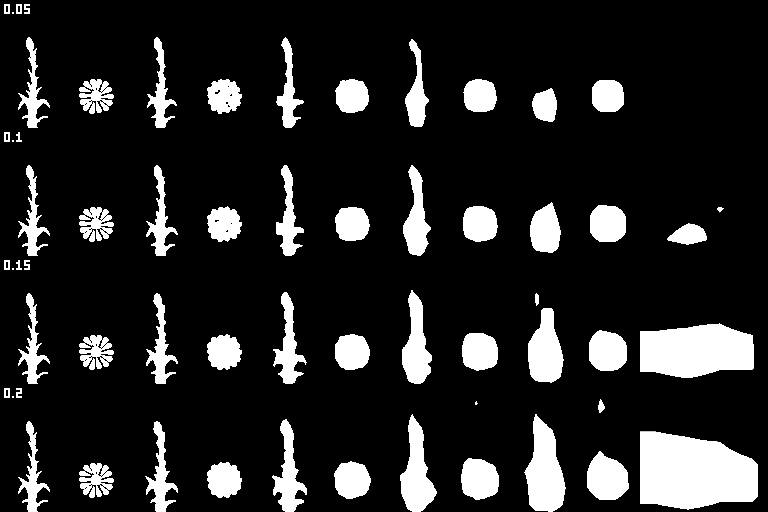
Yet again, it more or less works, but tends to make some unwanted parts of the image visible (i.e. non-transparent).
Method 6: coverage-based alpha remapping
This last method by Ignacio Castaño has the advantage of being based on something instead of being a random formula. It computes the coverage (i.e. proportion of pixels with opacity greater than 0.5) of the current mipmap level, then computes the next mipmap level by averaging, then finds a new cutoff value for the new level such that the coverage stays the same, then re-maps alpha values so that the cutoff stays at the 0.5 level. Finding a new cutoff value is done using a binary search.
This method is rather involved compared to the previous ones; here's the full code I used for cutoff search and re-mapping (source is the previous mipmap level, result is the currently-generated one):
// Compute the coverage of the previous mipmap level
float source_coverage = 0;
for (auto const & pixel : source)
    source_coverage += (pixel.a >= 0.5f ? 1 : 0);
source_coverage /= (source.width() * source.height());

// Find a new cutoff value using binary search
math::interval<float> cutoff_search_range{0.f, 1.f};
for (int i = 0; i < 16; ++i)
{
    auto mid = cutoff_search_range.center();

    float new_coverage = 0.f;
    for (auto const & pixel : result)
        new_coverage += (pixel.a >= mid ? 1 : 0);
    new_coverage /= (result.width() * result.height());

    if (new_coverage < source_coverage)
        cutoff_search_range.max = mid;
    else
        cutoff_search_range.min = mid;
}

// Re-map alpha values to account for the new cutoff
float cutoff = cutoff_search_range.center();
for (auto & pixel : result)
    pixel.a *= (0.5f / cutoff);
There are no tweakable parameters, so here's what it looks like for all three test textures:
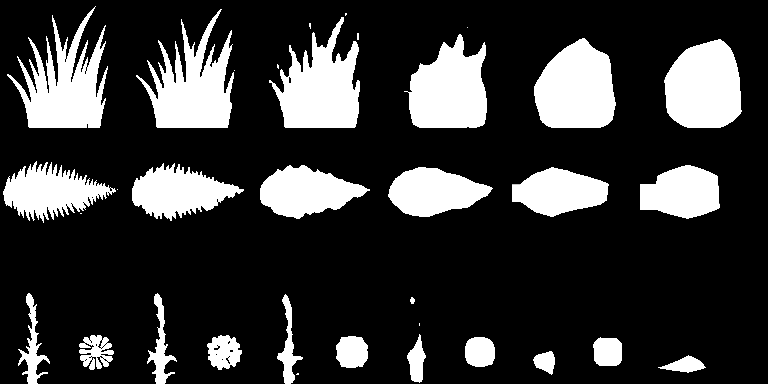
We can see that it doesn't actually suit my case: by preserving the coverage value, it fills some holes in the texture at the expense of thinner features, thus once again shrinking the overall shape. It has the advantage of guaranteeing that your texture won't disappear, but on these textures the result is pretty similar to simple averaging.
Note that Ignacio suggested a few improvements to this method for my case later, which I didn't have time to try yet.
Side note: generating SDFs
The last few methods will be using SDFs, which we first need to generate somehow. There are a number of methods for that:
- The jump flooding method seems to be the most popular choice, and it can be nicely implemented on the GPU (which I don't really care about since I'm generating mipmaps on CPU right now). However, this method is inherently inexact, though deviations from a ground-truth solution are typically unnoticeable for real-world data.
- The fast marching method is a variant of Dijkstra's algorithm which effectively computes a numeric solution to a differential equation satisfied by the SDF. It can be implemented efficiently with priority queues (just like Dijkstra), but is also only approximate.
- This post (sorry for a Medium link) describes a variant of fast marching that computes exact distance vectors as opposed to raw distances. It looks like the most promising option, but it also suffers from some edge cases when the closest boundary point is not unique.
Quite naturally, I rolled my own implementation based on k-d trees (which obviously was just an excuse to write a k-d tree). The way it works is like this:
- I have the original image, and I compute an alpha-tested mask out of it (i.e. output
(alpha < 128) ? 0 : 255) - The target object boundary (that we're computing SDF for) is the boundary between black and white pixels
- For each pixel center, I want to find the closest point on the boundary; it will always be either a pixel corner or the midpoint between two neighbouring pixel centers
- I compute all such corners and midpoints and put them into a k-d tree
- For each pixel center, I use the k-d tree to efficiently find the closest point on the boundary, which gives me the desired distance value
A bonus point is that all the points have either integer or half-integer coordinates, so the algorithm (and the k-d tree) can run on purely integer arithmetic (you'd want to use squared distances instead of raw distances for that; the final SDF value is still a floating-point, of course).
Another side note: the usual convention is that SDF is positive outside and negative inside, but in image processing the reverse convention makes more sense (e.g. this way the SDF roughly means the same as the alpha channel), and I'll use that convention as well.
Method 7: downsampling SDFs
The first idea is to simply replace the original image's alpha channel with the computed SDF, and then downsample it with basic averaging, in the hopes that SDFs will downsample better and keep the overall shape. Unfortunately, it doesn't work that well:
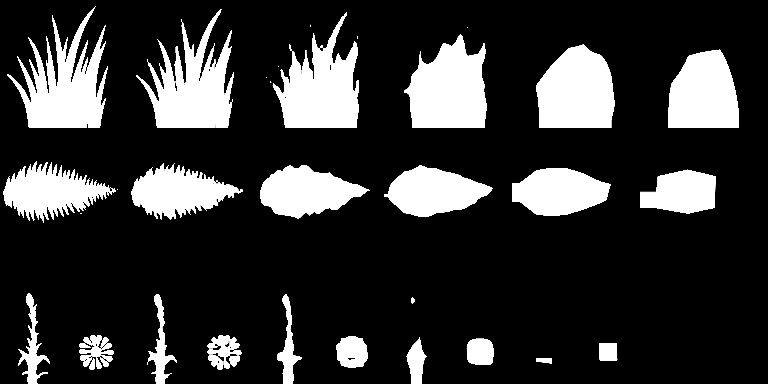
It seems to work pretty much the same as if we were doing simple averaging on the alpha channel. It kinda makes sense: if, say, your image is 25% filled, than 75% of SDF values will be negative (outside), and averaging them gives you a single "outside" pixel.
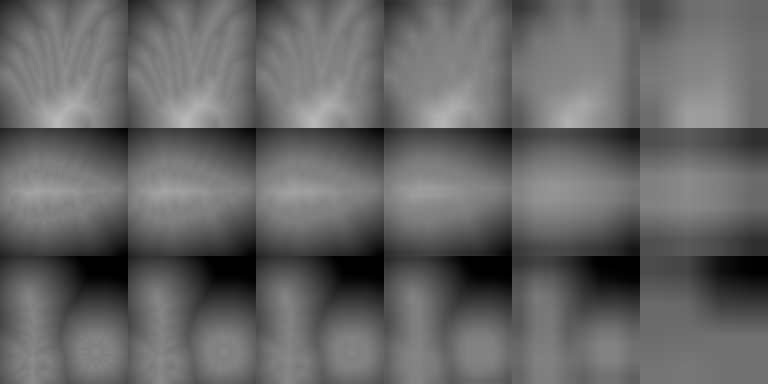
Here are the generated and downsampled SDFs, if you're curious:
Method 8: max-downsampling SDFs
A different idea is to max-downsample the SDF values (i.e. taking maximum of 4 SDF values from the previous mipmap level), instead of averaging them. This works stunningly well:
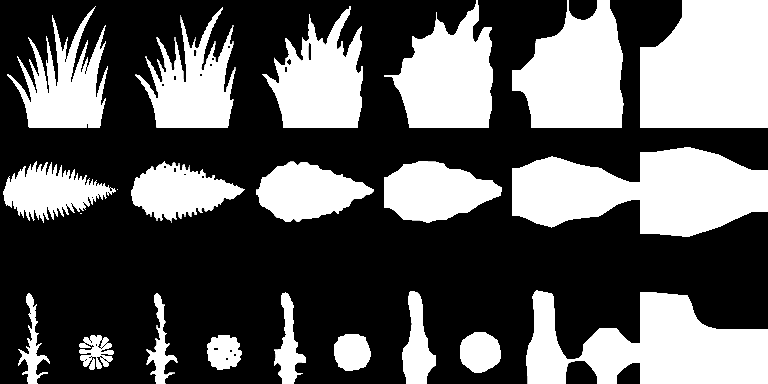
The 5-th mipmap level is a bit thicker than I'd want, but hey, remember that it's a 4x4 texture at this point. All the other mipmap levels looks great, even for the naughty flower texture.
It kinda makes sence as well: if we want to roughly preserve the shape, we probably want the closest distance (i.e. maximal SDF value), not the average distance (which can turn out to be negative way too often).
However, this method introduces two new problems. First, replacing the original texture alpha with the computed SDF is a bad idea, because it leads to jagged edges:
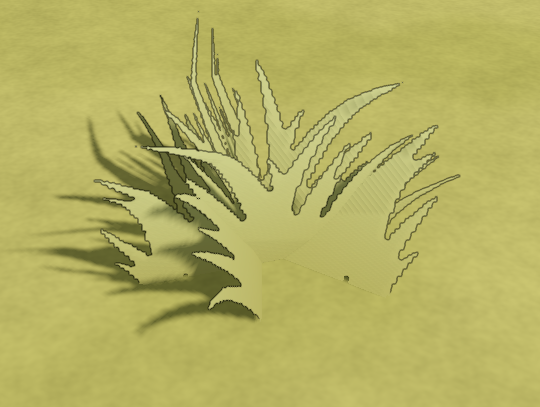
This happens because of how I compute the SDF by turning it into a binary mask first. This could be solved by a more sophisticated algorithm that doesn't throw away the invaluable data of the alpha channel, but instead runs a marching squares-like algorithm on it to determine the boundary shape, and then runs SDF on edges of this shape (instead of on individual points).
However, I've found that a simpler solution works well enough: just preserve the original alpha channel for mipmap level 0, and use downsampled SDF for all higher levels. Once the SDF is downsampled once, it's not that jagged anymore, and looks much nicer and smoother.
The second problem is that this method introduces color leaking from transparent pixels of the image, the same problem we already fixed by computing premultiplied colors. Replacing alpha with SDF breaks that and introduces non-zero alpha values for previously transparent pixels. Here's what it looks like:
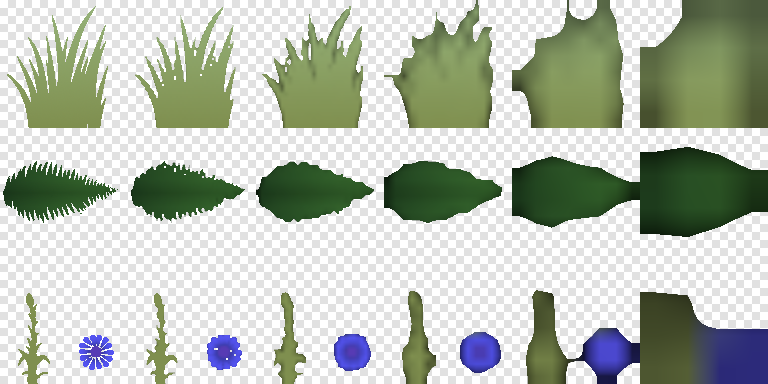
Method 9: averaging premultiplied colors, then max-downsampling SDF
So, to fix the color leaking problems, what I decided to do is first compute the mipmaps using usual averaging, and only then replace the alpha channels (starting from level 1) with max-downsampled SDF. Sounds like quite a burdern, but it works perfectly:
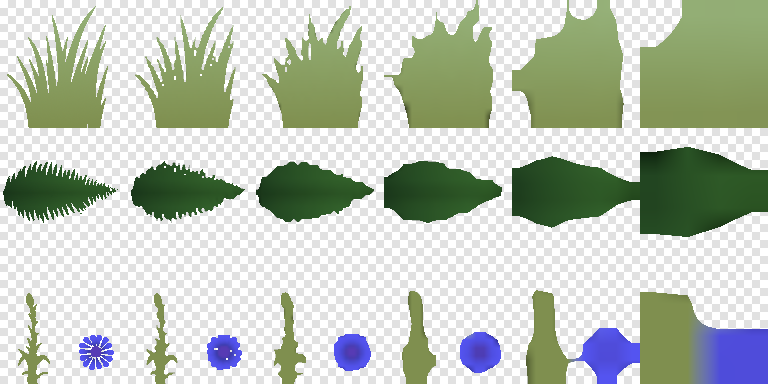
There are still minor color leaks due to bilinear interpolation, but they are tiny and not really visible.
Unfortunately (how many times did I say "unfortunately" in this post?), it breaks some other textures in this project, which are really small atlases for several related materials at once, like this one for an oak tree:

And here's what it looks like in-game with a mipmap LOD bias:
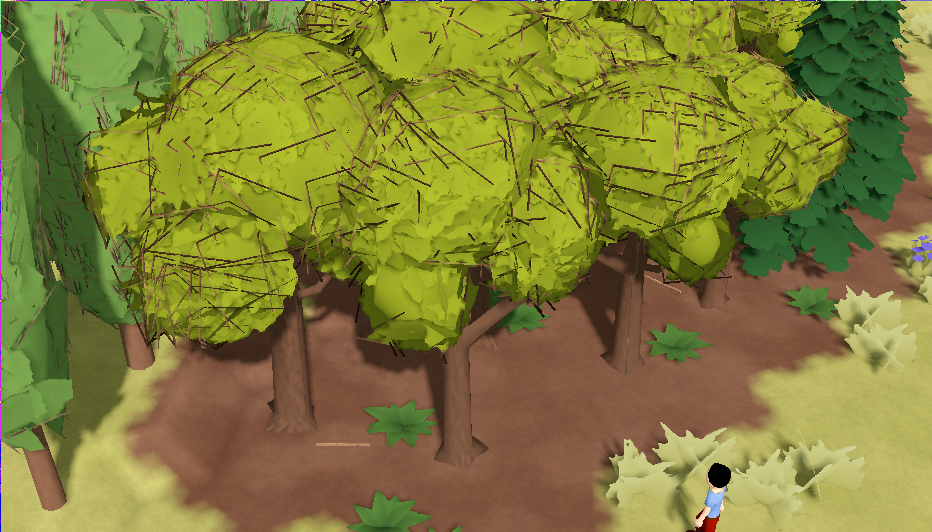
The different textures' SDFs leak into each other (because they are treated as a single image) and produce wrong results.
In truth, this problem exists even without all this SDF hackery, it's just way less pronounced:
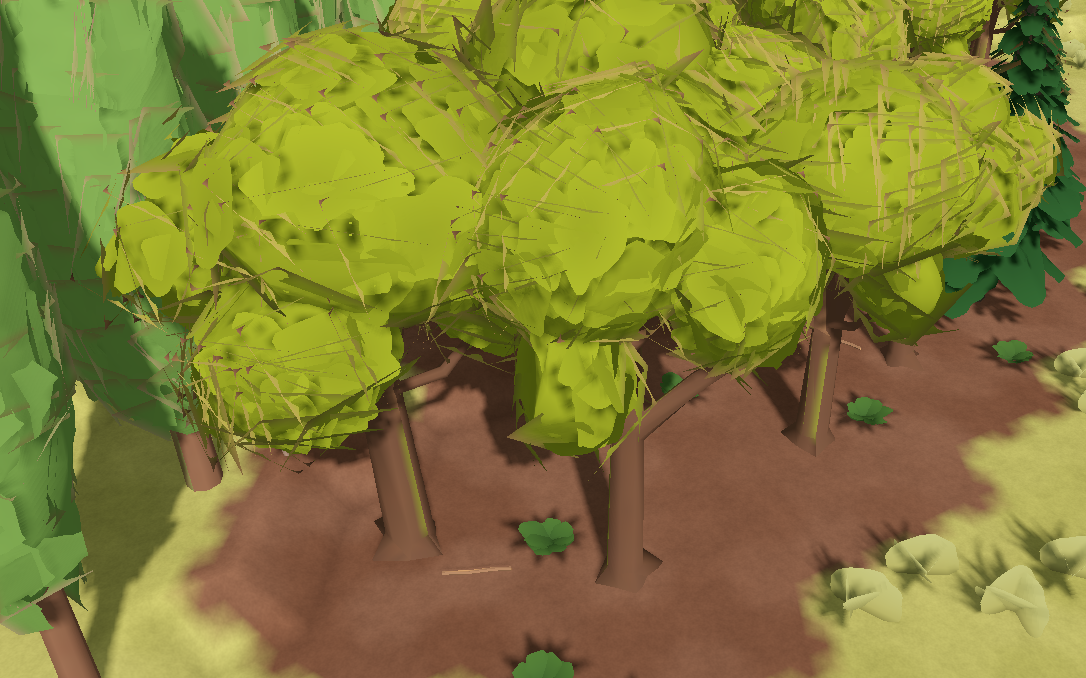
And honestly I should fix that regardless of the mipmap generation method I'll choose. I used such combined textures before because I had a restriction of having a single material per mesh. I've removed this restriction already, and probably it's about time to split these textures into separate images.
Conclusions
Here's what we've learnt about these methods:
- The coverage-based method guarantees that the texture won't disappear, but it tends to shrink the shape
- The shifting and lerping-to-1 methods are bad, because they make unwanted parts of the texture visible
- Other alpha-remapping methods have more or less similar properties
- Downsampling SDF tends to shrink the shape as well
- Max-downsampling SDF works great, but introduces color leaking
- Downsampling premultiplied images and then replacing their alpha with downsampled SDF seems to be the best option
I wanted to use the lerp-to-max method with a coefficient of 0.75, but experimenting with SDFs convinved me that it's a better option. Here's what a flower patch looks like with this method, again with a strong mipmap bias applied to amplify the effect:
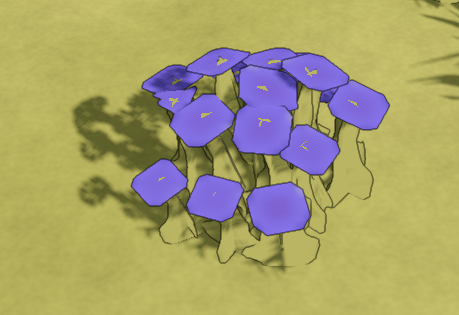
not a texture problem, I promise!
And here's how a full scene looks like:

Notice how the grass patches are crisp and detailed up close, and become somewhat blobby at a distance, preventing some naughty aliacing while roughly preserving the overall outline. That's exactly what I wanted.
The amazing Bart Wronski promised to write an in-depth post about SDFs and alpha maps from a digital signal processing perspective, so make sure to follow him so that you don't miss his post!
And for now, I hope you learned something useful, and thanks for reading.